After I’ve seen various questions in Facebook groups & forums about how to control your blinds and how to do a proper sun protection, I thought I’d share how I’ve done it.
The devices & programs I use to do this are:
- Blinds that I can control with values from 0 (completely closed) to 100 (completely open)
- Lux-Sensors (Fibaro FGMS)
- Mosquitto MQTT Server
- Node-RED for the logic
Easy Way: Sun Protection by using the LUX-Value only (not sufficient)
Sun Protection by using the brightness is the most common way, many manufacturers sell ready-to-use sets or sell brightness sensors as an extra.
The usual logic is that blinds are partially closed whenever the brightness has exceeded a certain threshold and opened again if the brightness has lowered. In Node-RED, this looks like this:

In the example above, an MQTT input is used to determine the current brightness. A Switch node decides whether it is too bright or not, followed by two change nodes to set the blind position value to either 100 (completely opened) or 30 (sun protection), that is then sent via MQTT to the blind.
Problems
The problem with this approach is that it will always enter sun protection mode, even if the sun is located at a very steep angle. So even if nearly no direct sun light enters the window, the brightness sensor will fire and the blinds are closed.
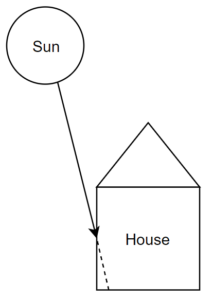
The opposite problem might occur, too. During sun set, the sun might lighten up your living room drastically and will dazzle people, but as the suns brightness is quite low already, the brightness sensor doesn’t exceed the threshold anymore and no sun protection is being activated.
Better: Sun Protection by including the sun position relative to the house
What I did to solve the above mentioned problems, I took the sun position relative to my home into account.
Retrieving the sun position / direction
To get the sun position, there is a nice Node-RED module called astrodata:
https://flows.nodered.org/node/node-red-contrib-astrodata
It offers a node called sunposition. To make it work, you need to enter your geolocation as latitude/longitude and height in meters. After doing that, you can inject any kind of data to make the node output the sun position as azimuth/altitude:
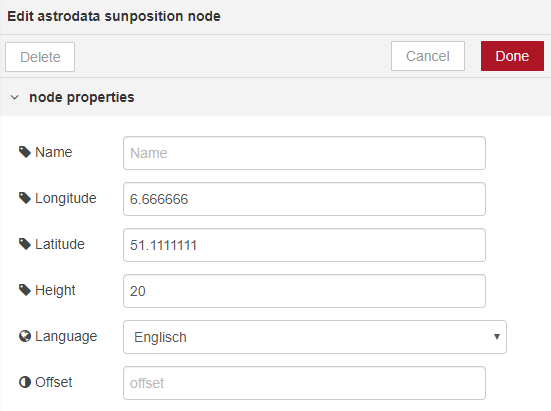
This node then outputs:
msg.sunAzimut
msg.sunAltitude
Retrieving the home position / direction
As we now know the direction of the sun, we need the home direction to have something we can compare against to.
The home direction can be extracted by using Google Maps:
- Switch to Satellite View
- Tilt the view and rotate it until you look into the direction of your front or garden (or whatever direction has windows)
- Look at / remember / copy the URL that is displayed in your browser bar to extract the information we need
Below is an example screenshot and the address that is displayed in the browser:
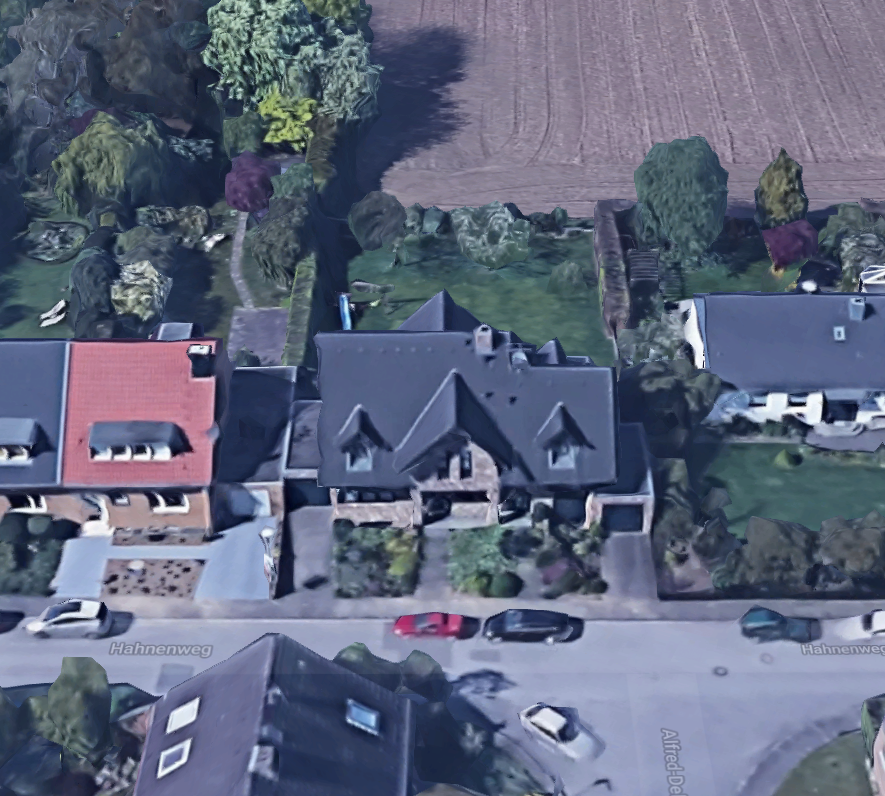
https://www.google.de/maps/@??.???????,?.??????,62a,35y,335.63h,56.76t/data=!3m1!1e3
It is important to note down the number that is displayed to the left of the h character. This is the angle at which we’re looking at, in this case it is 335.63 degrees.
You can either repeat the above steps to find the azimuth for any other window of your house or calculate them. In the above example, to find out the angle of the front windows, we just need to subtract 180° from the garden value.
Calculating the amount of sun irradiation into the building
Now that we’ve got the current sun direction and the direction of our windows, which are constant, we can calculate the amount of sun irradiation into these windows.
To do this, we convert the azimuth / altitude values for both the sun and our windows into three dimensional vectors. A 3D vector is has an x,y and z coordinate and defines a direction in three-dimensional space.
The formula to do this is not that hard and can be done like this:
function toVector(_altitude, _azimuth)
{
  _altitude *= Math.PI / 180.0;
  _azimuth *= Math.PI / 180.0;
  var z = Math.sin(_altitude);
  var hyp = Math.cos(_altitude);
  var y = hyp * Math.cos(_azimuth);
  var x = hyp * Math.sin(_azimuth);
  return {x:x, y:y, z:z};
}
In Node-RED, add this to a function node of your choice and call this function with the appropriate values. In my case, I added this to a larger function, but if you want to split it up a little bit more, that’s easily possible of course.
To create a single node that accepts the output of the sunposition node, as mentioned above, the function would look like this:
function toVector(_altitude, _azimuth)
{
  _altitude *= Math.PI / 180.0;
  _azimuth *= Math.PI / 180.0;
  var z = Math.sin(_altitude);
  var hyp = Math.cos(_altitude);
  var y = hyp * Math.cos(_azimuth);
  var x = hyp * Math.sin(_azimuth);
  return {x:x, y:y, z:z};
}

return toVector(msg.sunAltitude, msg.sunAzimut);
What about the home direction? So far, we only discussed how to get the azimuth, but what about the altitude? It’s easy, because the home is completely horizontal, the altitude is just zero ?
The same function as above can be used to convert the direction of your home/window to a vector, too.
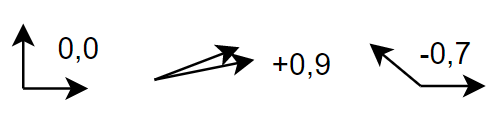
Once we have both as a vector, we have to calculate how much they’re matching up. This is where a common 3D function, the so called Dot Product comes into place.
The Dot Product returns how much two vectors match the same direction. The result is a factor between +1 (two vectors point into the same direction) and -1 (two vectors point in opposite directions).
In Node-RED, the dot product can be implemented like this:
function dot(_a, _b)
{
  return _a.x * _b.x + _a.y * _b.y + _a.z * _b.z;
}
Now if you input the vector of the sun and the vector of a window, you’ve got a sun irradiation factor for this window.
Combining Window Irradiation Factor and Brightness
If you use only the window irradiation factor to control your blind, the blind will be in sun protection mode even if it’s cloudy. To overcome this, we combine the irradiation factor with the brightness value as reported by a brightness sensor.
In my case, the sensors report the brightness as Lux. I have one sensor in the garden, another one at the front. We can combine the brightness value with the irradiation factor by just multiplying them together:
var frontSunIntensity = frontIrradiation * frontBrightness
This causes the brightness value to be scaled by the irradiation factor. For example, if the brightness sensor reports 10000 Lux, but the irradiation is only 0,5, the final value would be 5000.
Setting a blind to sun protection mode now requires a simple threshold function as above, except that we do not use the brightness value as source, but except we use our overall sun intensity value.
I use a threshold of 3500, but this depends on your location and the used sensors. Best is to add a dashboard element to Node-RED to be able to adjust this threshold.
Conclusion
By combining the brightness and the irradiation factor, we solve several problems.
- On a cloudy day, sun protection is not enabled, as it is done in most simple setups
- If the sun angle is very steep, sun protection is no longer enabled by accident
- During sun set & sun rise, sun protection is enabled although it is not as bright as during noon
I use this system for over a year now and didn’t experience any situation yet where sun protection was inappropriate or missing.
I added one further feature to prevent erratic behaviour on a day where smaller clouds frequently cover the sun: You might consider adding some delay nodes so that the blinds are not constantly moving up and down all the time. In my case, sun protection is enabled for at least 30 minutes.
Hope this article has shed some light ? into how a possible sun protection can be achieved. If you like it, feel free to share!
Node-RED flow
Update 2021:
I’ve got several requests to share the Node-RED flow. This is not that easy as the input for the brightness may come from plenty of devices. Below is the „interesting“ part, the sun position & factor calculation, the output is sent to an MQTT server. This can be used to further processing.
The only thing that is missing is a factor with the overall brightness and a threshold function to control the blinds.
[{"id":"8c80c880.3930f8","type":"tab","label":"SunIntensity","disabled":false,"info":""},{"id":"b419da0c.d06468","type":"astrodata sunposition","z":"8c80c880.3930f8","name":"","lon":"6.5","lat":"52","height":"20","x":278,"y":155,"wires":[["fdd7a6d9.297968","572aef1f.ea47a","48a47bc5.6a2a54"]]},{"id":"255d9cf1.d40654","type":"inject","z":"8c80c880.3930f8","name":"5min","topic":"","payload":"","payloadType":"date","repeat":"300","crontab":"","once":false,"onceDelay":0.1,"x":116.87948608398438,"y":146.32626342773438,"wires":[["b419da0c.d06468"]]},{"id":"fdd7a6d9.297968","type":"change","z":"8c80c880.3930f8","name":"sunAzimut","rules":[{"t":"set","p":"payload","pt":"msg","to":"sunAzimut","tot":"msg"},{"t":"set","p":"topic","pt":"msg","to":"Azimuth","tot":"str"}],"action":"","property":"","from":"","to":"","reg":false,"x":491.2900085449219,"y":88.54107761383057,"wires":[["b965ee6a.8601b"]]},{"id":"572aef1f.ea47a","type":"change","z":"8c80c880.3930f8","name":"sunAltitude","rules":[{"t":"set","p":"payload","pt":"msg","to":"sunAltitude","tot":"msg"},{"t":"set","p":"topic","pt":"msg","to":"Altitude","tot":"str"}],"action":"","property":"","from":"","to":"","reg":false,"x":491.8013000488281,"y":128.03579807281494,"wires":[["26982780.603a68"]]},{"id":"48a47bc5.6a2a54","type":"function","z":"8c80c880.3930f8","name":"sun intensity","func":"var sunAltitude = msg.sunAltitude;\nvar sunAzimuth = msg.sunAzimut;\n\n// Define azimuth of garden & front, extracted from Google Maps\n\nvar gardenAzimuth = 140.0;\nvar frontAzimuth = gardenAzimuth + 180.0;\n\n// convert polar coordinates to a three-dimensional vector\n\nfunction toVector(_altitude, _azimuth)\n{\n _altitude *= Math.PI / 180.0;\n _azimuth *= Math.PI / 180.0;\n\n var y = Math.sin(_altitude);\n var hyp = Math.cos(_altitude);\n var x = hyp * Math.sin(_azimuth);\n var z = hyp * Math.cos(_azimuth);\n\n return {x:x, y:y, z:z};\n}\n\n// three-dimensional dot product of two vectors. Returns a value between -1 and +1\n// +1 means that they point into the same direction\n// -1 means that they point in opposite directions\n\nfunction dot(_a, _b)\n{\n return _a.x * _b.x + _a.y * _b.y + _a.z * _b.z;\n}\n\nvar vecSun = toVector(sunAltitude, sunAzimuth);\n\nvar vecFront = toVector(0.0, frontAzimuth);\nvar vecGarden = toVector(0.0, gardenAzimuth);\n\nvar factorFront = dot(vecSun, vecFront);\nvar factorGarden = dot(vecSun, vecGarden);\n\nreturn [\n {payload:factorFront, topic:\"factorFront\"},\n {payload:factorGarden, topic:\"factorGarden\"},\n];\n","outputs":2,"noerr":0,"x":558.8794860839844,"y":193.32626342773438,"wires":[["8c30a028.0e1ce"],["974bc27c.2ed4e"]]},{"id":"e4c249f6.b4e3a8","type":"mqtt out","z":"8c80c880.3930f8","name":"","topic":"weather/sunintensitygarden","qos":"","retain":"true","broker":"bd614572.ba1df8","x":949.8795166015625,"y":224.32626342773438,"wires":[]},{"id":"e2e8d69d.3a7c68","type":"mqtt out","z":"8c80c880.3930f8","name":"","topic":"weather/sunintensityfront","qos":"","retain":"true","broker":"bd614572.ba1df8","x":940.8795166015625,"y":176.32626342773438,"wires":[]},{"id":"ac44f755.309128","type":"mqtt out","z":"8c80c880.3930f8","name":"","topic":"weather/sunazimuth","qos":"","retain":"true","broker":"bd614572.ba1df8","x":801.8794860839844,"y":68.32626438140869,"wires":[]},{"id":"203eecde.0595e4","type":"mqtt out","z":"8c80c880.3930f8","name":"","topic":"weather/sunaltitude","qos":"","retain":"true","broker":"bd614572.ba1df8","x":793.8794860839844,"y":115.32626438140869,"wires":[]},{"id":"b965ee6a.8601b","type":"rbe","z":"8c80c880.3930f8","name":"","func":"rbe","gap":"","start":"","inout":"out","property":"payload","x":635.8794860839844,"y":73.32284641265869,"wires":[["ac44f755.309128"]]},{"id":"26982780.603a68","type":"rbe","z":"8c80c880.3930f8","name":"","func":"rbe","gap":"","start":"","inout":"out","property":"payload","x":636.8794860839844,"y":116.32284641265869,"wires":[["203eecde.0595e4"]]},{"id":"8c30a028.0e1ce","type":"rbe","z":"8c80c880.3930f8","name":"","func":"rbe","gap":"","start":"","inout":"out","property":"payload","x":758.8795166015625,"y":180.32284545898438,"wires":[["e2e8d69d.3a7c68"]]},{"id":"974bc27c.2ed4e","type":"rbe","z":"8c80c880.3930f8","name":"","func":"rbe","gap":"","start":"","inout":"out","property":"payload","x":757.8795166015625,"y":219.32284545898438,"wires":[["e4c249f6.b4e3a8"]]},{"id":"bd614572.ba1df8","type":"mqtt-broker","z":"","name":"mosquitto","broker":"mqtt","port":"1883","clientid":"nodered","usetls":false,"compatmode":true,"keepalive":"60","cleansession":true,"birthTopic":"","birthQos":"0","birthPayload":"","closeTopic":"","closeQos":"0","closePayload":"","willTopic":"","willQos":"0","willPayload":""}]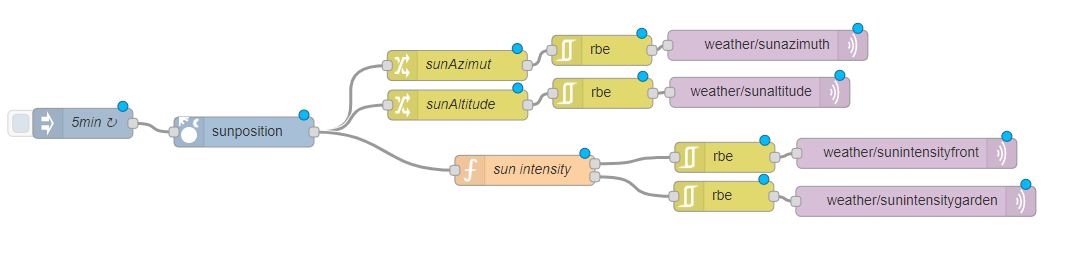


 Der
Der 